Applying for a tourist visa for India is no longer hard! Well, not as hard as it once was!
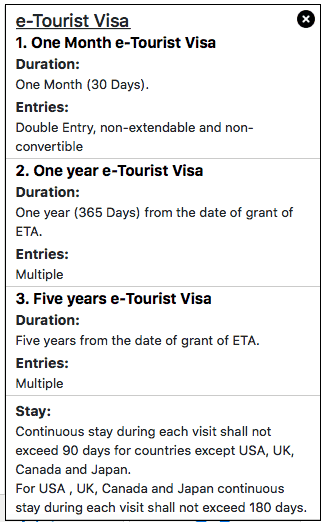
As of 2020 there became 3 tourist visas for India you can apply for – 30 Days, 1 Year, 5 Years.
Here is a step by step guide of how to apply for a visa for India online so you can get an e-visa for India no matter where you are from. This is how to get a visa for India from UK, how to get a visa for India from USA, and every other country!
Tourist Visa for India
SIM CARD FOR INDIA
I really recommend having a sim card in India as it makes travel in India so much easier! You may have heard that it’s hard to get a sim card in India but you can get a sim card in Delhi Airport, read this post to see how to buy a sim card in Delhi Airport or if you fly in elsewhere 3 ways to buy a sim card in India and you’ll be connected in just a few hours!
WHAT TO WEAR IN INDIA
If you are a woman, here’s what I recommend you pack and wear in India. Technically you can wear what you like in India in most places but to get fewer stares and feel more comfortable, read my post!
DON’T GET SCAMMED IN DELHI
Most people arrive for the first time into Delhi and get scammed within a few hours! Read my Delhi Travel Tips to help you enjoy Delhi, and the best places to stay in Delhi which is so important!
This is a breakdown of the e-tourist visas for India that are on offer from the official India visa application website:
IMPORTANT NOTE: Before you read this post too much, I want to tell you now that if you are applying for the 1 month visa for India (aka the 30 day visa), you can only apply when you are within 30 days of going, so if your trip is more than 30 days away, bookmark this post and come back to it 30 days before you visit India!
There are 2 ways to get your Indian visa online:
Find What You're Looking For Easily Here!
1) The Official E-Visa website
This is the official India e-Visa website to get your India visa on for all nationalities, and this blog post is going to show you how to go through the online India visa application.
2) An India Visa Specialist
When you type into Google ‘how to get an Indian visa‘, you will come across other sites to the one above, they will tell you that this is how you get a visa for India, but they will charge you extra money on top of the standard visa fee because they are 3rd party sites.
However, the positive of using third party visa websites is that they offer you assistance and make the visa application process easier.
I have been speaking to iVisa who offer visa services for India. I didn’t use them because I think the official site is easy to navigate and I’m going to explain how to use it below, but if you have any issue working the official system or you’re happy to pay a bit extra to get some assistance and help,

I’d recommend getting your India visa through iVisa by clicking here.
Applying for India Tourist Visa Via Official E-visa Website
Here’s a step-by-step guide with pictures and screenshots to apply for an E-visa for India.
Step 1: Indian E-Visa Application Form:
On the Homepage, click For eVisa by Bureau of Immigration. Apply here.
(If you are applying for a visa for India from Japan or South Korea, click the button with your flags next to it.)
You’ll be taken to this page:
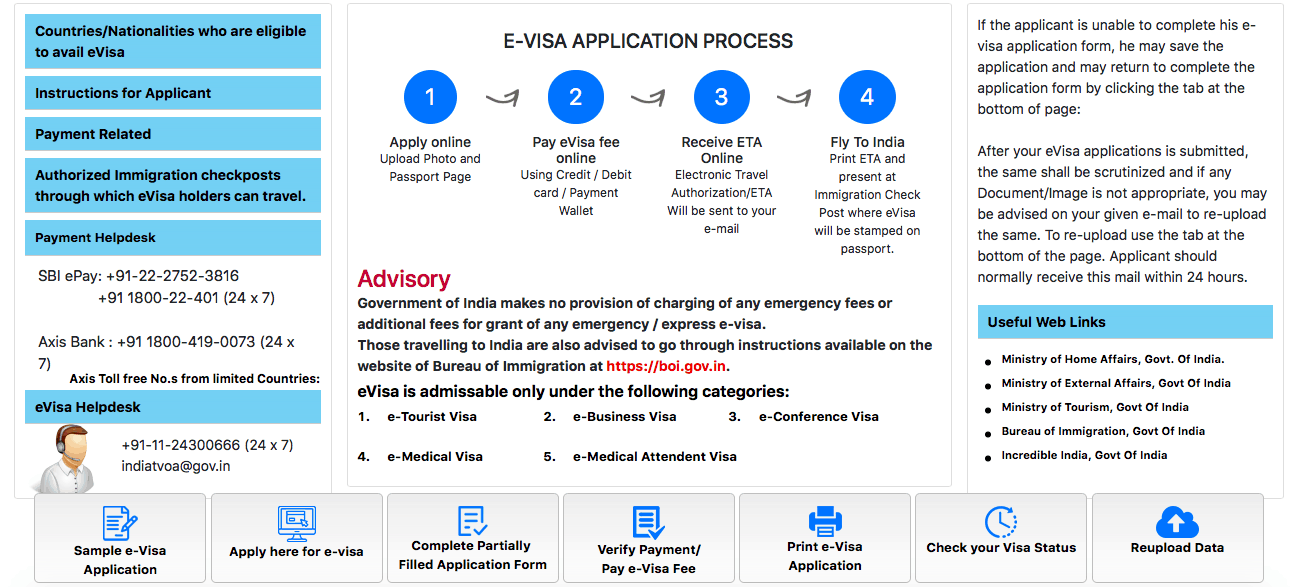
Under Advisory you can check the Indian visa types on offer. When you click on the number, details will appear on the right about how long the visa for India lasts and extra nationality information so if you are not from the UK, check the details for your country.
(FYI that I am guiding you on how to get a visa for India using a desktop so the buttons may be in different places on a mobile.)
For example, at the time of writing this post, this is what the 1. e-Tourist Visa details show with the 3 different options:
As you can see if you’re applying for an Indian Visa from the USA, Canada, UK or Japan you can stay for longer without leaving to go back.
Click the Apply here for e-visa at the bottom left of the page.
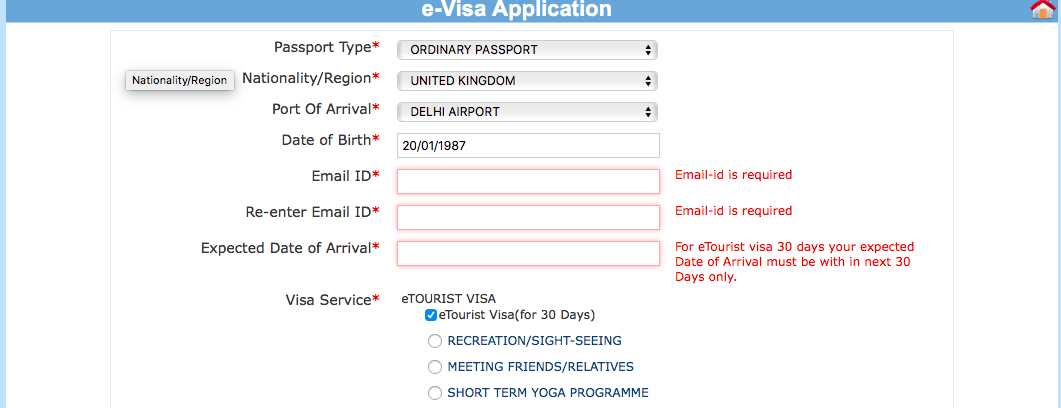
Step 2: Completing the form:
Page 1 asks for simple contact and personal details.
The only bit that may catch you out here is port of arrival and expected date of arrival if you do not know when you’ll enter India yet. If you do not know, the answers do not need to be exact or correct but try to get them as near as possible. For example, it’s fairly likely you’ll fly into Delhi, Mumbai or Goa as these are the 3 main airports in India.
However, if you are applying for the 30 DAY VISA, note that you can only apply for this within 30 days of your arrival date, so if you don’t know when you’ll visit India yet, you should probably think about this first. After this, your visa will be valid for 30 days once you arrive in India.
If you plan to arrive by land, be sure to check what I’ve said about land border crossings into India in the important information section at the bottom of this post. If you plan to arrive into India from Pakistan, read this blog post about crossing the Wagah Border.
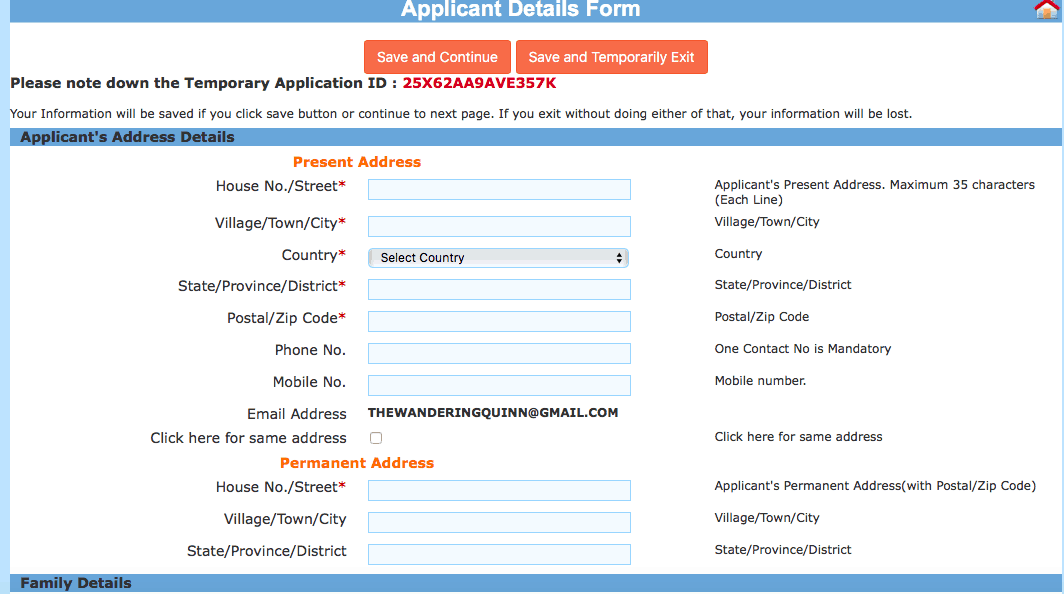
Page 2 asks for more details and your passport details.
On the question Citizenship/National Id No – type NA and for Visible identification marks – type NA too.
IMPORTANT TIP: Make a note of the Temporary Application ID at the start so if the form crashes midway through (which it may well do) you can go back to the homepage and continue to fill out the pre-filled out form from there rather than starting again.
Page 3 requests details for address, family details and occupation.
Page 4 gets you to confirm and check the type of visa you are applying for. Generally, unless you are visiting India for business, you will be applying for an eTourist visa. It also asks you for more details about your trip to India.
You’re asked for Places to be visited, in the box, name as many places as you can but you don’t need to name them all and there are limited characters for the box so you can’t name them all anyway.
If you do not know your India route yet, popular places to visit in India that you’ll probably go to are Delhi, Agra, Jaipur, Jodphur, Varanasi, Mumbai, Goa, Kerala. After you’ve finished with your visa, you can look at one of my India itineraries to help you plan your trip!
BOOKING TRAINS IN INDIA
India is best travelled by train because its the quickest, cheapest and best way of getting to know the country. For an EASY option of booking trains in India use 12GO to search and book trains really easily. If you’ll be in India for awhile, you can use the local booking system, it’s a bit tricker but possible, here’s my post on how to book trains in India as a tourist.
BEST ACCOMMODATION IN INDIA
I always use Booking.com to book my hotels in India and Hostelworld to book my hostels. India has a great range of accommodation with brilliant hostel chains like Moustache, Zostel and Backpacker Panda as well as homestays to luxury hotels.
GUIDED TOURS IN INDIA
Many cities in India are best seen with a guide, even if it’s just a half day tour on your first day. Cities in India are chaotic and complex and what better way to taste the food and get to know the city than with a local. I recommend Get Your Guide & Viator for the best tours in India!
Have you booked any room in Hotel/Resort etc. through any Tour Operator? – If you’re visiting India solo and you’re not visiting India on a tour, click no. If you are visiting on a tour click yes and give the tour operator details.
When they ask for Countries Visited in Last 10 years, note that although it lets you add 50+ Countries as I added, when you proceed you’ll get an error message to say you can only add 20. So only add up to 20 if you have been to more.
- My Must Read India Blog Posts To Help You See the Best of India!
- 24 places in India Perfect for Your First Trip!
- Golden Triangle India Itinerary for 1 Week in India!
- A 2 Week India Itinerary For Your First Trip To India!
- A 2 Month India Itinerary Visiting North & South India!
- How to Get a Sim Card in Delhi Airport!
- 10 Delhi Travel Tips to See & Enjoy Delhi as a Tourist!
- All My India City Guides and Tips
Have you visited SAARC countries (except your own country) during last 3 years? The SAARC countries are Afganistan, Bhutan, Pakistan, Maldives, Sri Lanka, Bangladesh, Nepal.
Reference Name in India: Put your first hotel/hostel name if you have one booked, if not pick any accommodation in the city you might go to first. For example, I used the details of Backpacker Panda in Colaba, Mumbai as I have been there before and might go back.
Related Blog Post: Best Places to Stay in Delhi, Hostels, Hotels & Airbnbs!
Reference Name in Home Country: This is where you add your next of kin details.
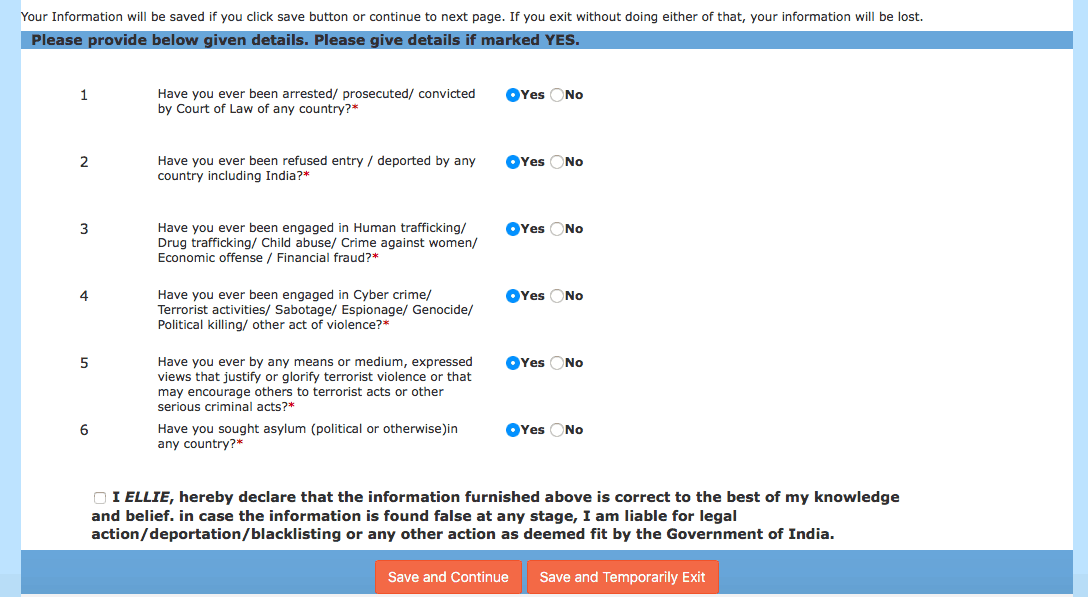
Page 5 asks you to answer, what should be, pretty easy questions!
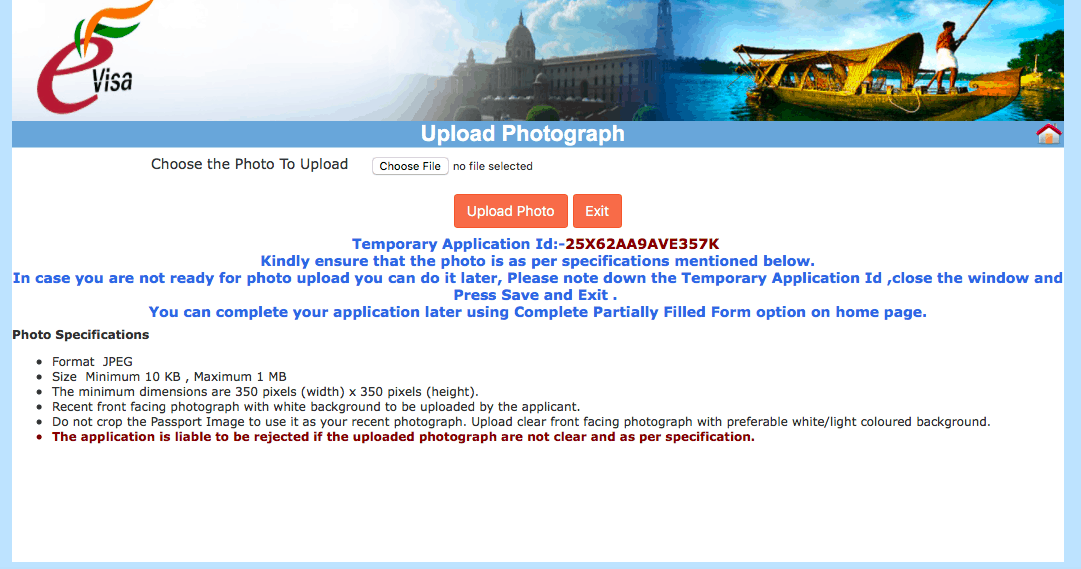
Page 6 is where things can get a bit more tricky but it’s not too hard if you follow these steps.
You need to upload a passport photo to go along with your Indian online visa.
They give you the dimensions and details- it must be a JPEG photo, between 10KB and 1MB, and a minimum of 350×350 pixels.
This can seem tricky but my secret is that I tried scanning in 2 different sized passport photos and uploading them but it didn’t accept them. I then took a photo of a passport photo on my phone, transferred it to my laptop, uploaded it and it worked!
Note that your photo may be too big, but it may also be too small so be sure to read the red warning correctly if it will not let you load a photo.
Once it is uploaded, you’re given the chance to crop it to the dimensions they need in the next screen. Easy!
Related Post: Are you still working out where to visit in India? Here are 24 places in India perfect for your first trip!
Page 7 asked you to upload a copy of your passport photo page in a PDF format.
What I did is take a photo of my passport on my phone and transferred it to my laptop, as I did with the passport photo.
I opened the photo and changed the size to fit the minimum 10KB and maximum 300KB requirements and I exported it into PDF all on my Mac before uploading it. If you do this, make sure you rename the photo with .PDF at the end or it won’t accept it and will keep telling you it’s not a PDF.
See the screenshots below for help on how to resize a photo and export to PDF on a Mac.
Then, make sure you click upload under the file name so you get the green ‘uploaded’ status on the right.
If you are having real issues at this stage and cannot upload the right photo, this is where I’d suggest you look into help from iVisa!
If you need to go away and take photos before you can upload them remember you can save your application and come back to it. Make a note of the Temporary Application ID and return to it within 7 days, otherwise, you’ll need to start again after 7 days.
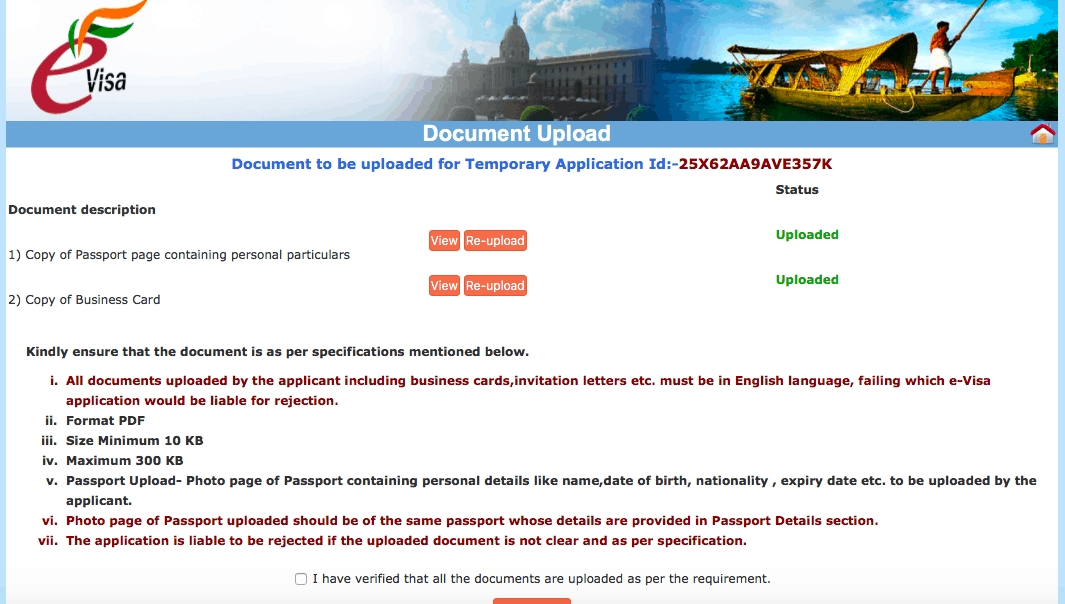
(Note that I applied for a business visa for India as I ran tours in India, so my screenshot asks for my business card, you won’t be asked for this if you’re applying for a tourist visa.)
Page 8 asks you to confirm the details you have entered so far.
Step 3: Paying for the Visa:
Page 9 is where you complete the online Indian visa payment.
Make a note of the application ID, this is different from the Temporary Application ID you were given before.
Choose your payment type and click Pay Now.
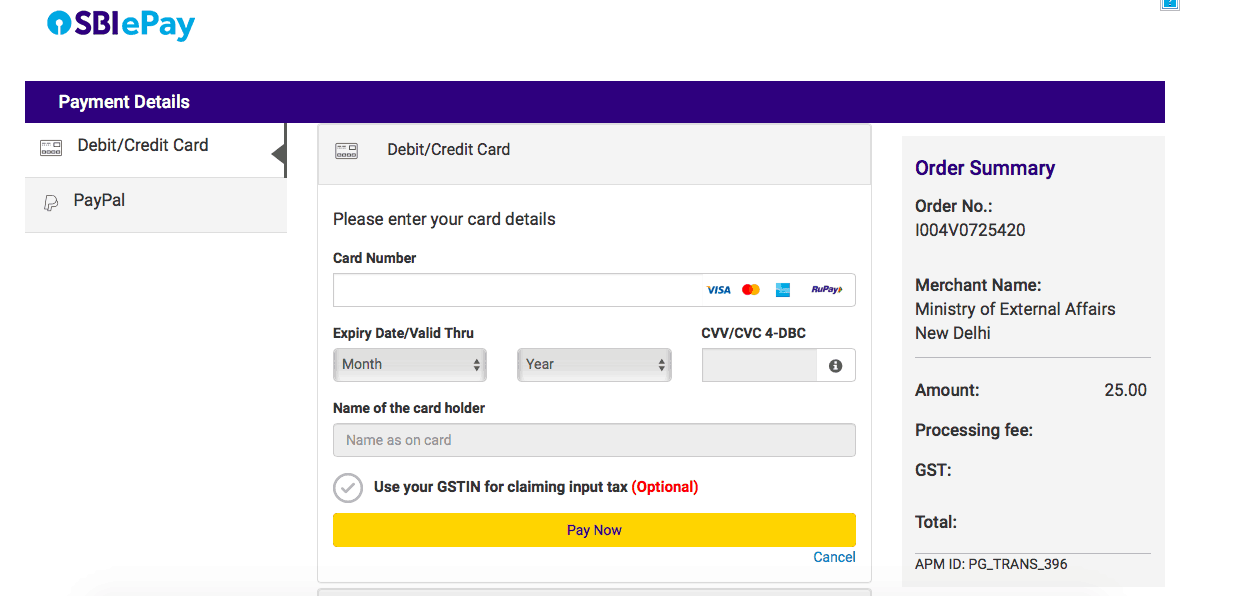
I clicked onto Paypal which took me to this SBIePay site where I could pay via PayPal or by debit or credit card using Visa or MasterCard. Amex does work but there is an extra fee.
As you can see, the 30 day tourist visa for India costs $25.00, the one year visa for India cost is $40.00
If you have issues paying as the system is crashing or doesn’t look like it’s processing the payment, leave the page and to go back to the homepage and click on Verify Payment / Pay e-Visa Fee which takes you to a page you can enter the application Id you were given and check the status. If the payment has processed, it will say.
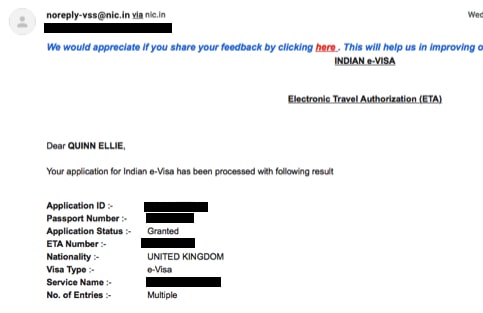
Shortly after I got an email to say my visa application had been successfully received and the application will take up to 72 hours to be processed.
To my delight, I got an email 18 hours later to say it had been granted! That’s quick!
To finish the Indian e-visa process, I went back to the official Indian visa homepage, clicked Check Visa Status, filled in the details, and then clicked Print Status, which downloaded a copy of my granted ETA visa for India as a PDF which I printed to take with me to enter.
Just when you are finished applying for an Indian E-visa and decided the dates, you might want to book the flights. I use Skyscanner to book all of my flights! I’m a huge fan of Skyscanner because I love how easy it is to compare different dates and routes to help me find the best flight at the best price! Open Skyscanner by clicking here and search for the best flights as you read this post.
Important Things To Note About The Tourist Visa for India
I hope you can tell from this post that you MUST apply for your visa for India in advance and as you can see it can take up to 3 days / 72 hours to process so give yourself time.
DO NOT ARRIVE AT THE AIRPORT WITHOUT A GRANTED VISA FOR INDIA. India does not offer a visa on arrival and you’ll be refused on your flight or into India.
The 1 year and 5 year visa for India starts as soon as it is granted by email. This isn’t too much of a problem because of the length of the visa but it means the earlier you apply for the visa, the earlier it expires so don’t apply for it too far in advance if you think you’ll go back and forth to India over the next year.
HELP WITH YOUR INDIA ITINERARY
I’ve spent many months travelling India in the last few years visiting over 50 places around the country, here are my recommended itinerary posts for India to help you plan your trip!
2 WEEK INDIA ITINERARY, PERFECT FOR YOUR FIRST TRIP!
2 WEEK SOUTH INDIA ITINERARY – GOA & KERELA
1 MONTH NORTH INDIA ITINERARY IDEAS!
1 MONTH SOUTH INDIA ITINERARY IDEAS!
However, the 30 day tourist visa for India gives you 30 days from when you enter, not from when it’s approved!
With that being said, you can’t apply for the visa earlier than 180 days before your intended trip, or 30 days if you get the 30 day visa.
Although this is a 365 day visa, most nationalities can only stay for 90 days at a time, then they will have to leave and come back. People with a UK, USA, Canadian or Japanese passport (as of writing this) can stay for up to 180 days at a time.
PRINT off the visa ETA application that is sent to you as you may need to show it when you arrive in India.
As of August 2019, applicants can arrive at 28 e-Visa designated airports in India which are Ahmedabad , Amritsar , Bagdogra , Bengaluru , Bhubaneshwar , Calicut , Chandigarh , Chennai , Cochin , Coimbatore , Delhi , Gaya , Goa , Guwahati , Hyderabad , Jaipur , Kolkata , Lucknow , Madurai , Mangalore , Mumbai , Nagpur , Portblair , Pune , Tiruchirapalli , Trivandrum , Varanasi , Vishakhapatnam, and 5 designated seaports– Chennai , Cochin , Goa , Mangalore , Mumbai. However, he/she can depart from any of the authorized Immigration Check Posts in India.
It’s popular for travellers to travel into India by land border from Nepal, there are also land borders to cross into India from Pakistan and Bangladesh however with this new visa because it is not technically in your passport already like it used to be if you went to a visa office in your home country.
From what I understand you CANNOT arrive into India via land border for the first time on an e-visa as they need to put a special stamp in, you can re-enter India via land though once your e-visa is in your passport.
This was reconfirmed to me when I travelled from Pakistan to India via the Wagah Border, I could do it as I had the visa in my passport already but I could not have done it if I didn’t.
If you plan to travel into India by land from Nepal, Pakistan, Bangladesh or any other way, I would strongly recommend speaking to the Indian Visa Office first to check if that’s ok, their email is [email protected] and their number is +91-11-24300666.
Lastly, the visa rules for India state that you need proof of exit from India so you may be asked to show a flight out of India when you check-in at your departing airport. If you don’t have this because you don’t know when or where you’ll leave India from, you can either book a super cheap flight on Skyscanner, or you can use Expedia.com to book a flight when you get asked at the airport and to book a flight with a 24-hour cancellation notice so you can cancel it within 24 hours with no charges!
Make sure you also check out by India blog posts & YouTube videos to help plan your trip!
Finally, if you want to start looking into how to get from place to place by train and bus in India, although I recommend getting the train as much as possible, head on over to 12GO Asia to check out some routes and I suggest you book these in advance too!
Nasrin
Saturday 17th of February 2024
Thanks so much for your blog. Very useful ad helpful espcially the part of the photos and uploads!!! I just applied for the indian evisas for my husband and I. We have our trip comletely planned and paid before we applied for the Visas. We also had our vaccinations and malaria pills so we are all set. We now have to wait for the visas to come through. Keeping our fingers crossed that it processes quickly and it is approved quickly as well.
Thanks agin!!! Really appreciate your blog!!!
Michael
Thursday 11th of January 2024
Hello!
A big thank you for the post, it has been such a valuable benefit in the visa application process. We had ours granted within 12 hours of submitting. Result!
TheWanderingQuinn
Monday 15th of January 2024
Really glad to hear this, thanks for letting me know.
Jacqueline
Sunday 7th of January 2024
Hi
I’m travelling to India Feb 24 via cruise ship, I will be visiting Goa, Cochin and Mumbai before travelling home via Mumbai Airport. I have received conflicting advice on what e-Tourist Visa I require ie 30 day or 1 year. Could you possible help?
Jacqueline
Monday 29th of January 2024
@TheWanderingQuinn,
Thank you so much for your advice on applying for a Visa. My application was successful and granted within 14 hours. I couldn’t have done it without your assistance. Thank you
TheWanderingQuinn
Monday 8th of January 2024
Hello, sounds like a great trip. I'm not 100% sure, if you are in India less than 30 days it seems like that one should be ok but if it will be more than 30 days from you arriving my ship and leaving from the airport you'll need the 1 year option. Is that the case?
Mary Toole
Saturday 4th of November 2023
I am cruising Singapore to Mumbai with a stop at Cochin sea port. I then continue to Mumbai where I disembark for 3 days hotel stay in Mumbai before flying home from Mumbai airport. Will a 30 day tourist e-visa cover me for this trip? Thank you so much for your help.
TheWanderingQuinn
Monday 6th of November 2023
Hello, wow, that sounds like a great trip! Yes, the visa will cover you for that. The cruise company should advise what visa (if any) you'll need for Cochin as being a cruise stop it might be different but because you are staying on in Mumbai afterwards I assume you will need a visa and therefore the 30 day tourist visa will be the right on :)
Awaya
Tuesday 31st of October 2023
Thank you for writing such a detailed and helpful article.
Couple of things i was curious about: You'd mentioned that you got the approval within a day for your 30-day visa, but any idea if the Authorization takes longer if the application is for a 1 year or a 5 year visa? if the times / costs are approximately the same, I'm curious why one would apply for a 30-day visa instead of a longer duration.
Lastly, are there additional steps / documents required depending on the length of the visa duration?
Thanks